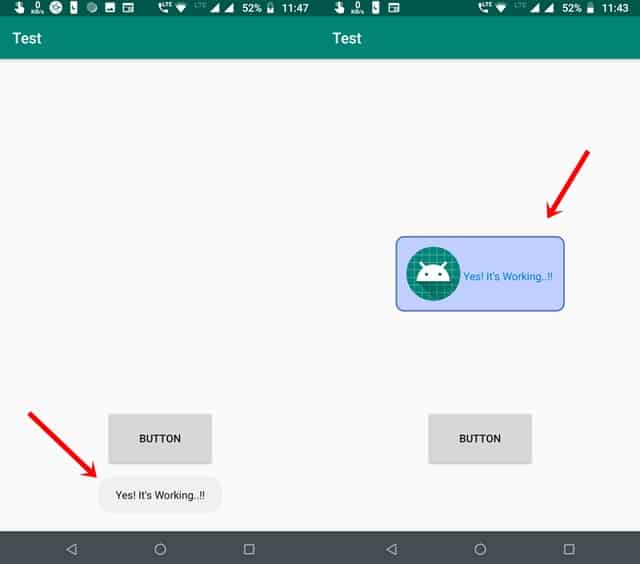
If you are using an Android phone, you must have encountered a short-duration flash message several times. This is called Toast and is used to display temporary messages in android apps.
There are various advantages of using Toast but specifically, it depends on the requirements. I prefer toasts because it doesn’t block the Activity or Fragment while running and disappears after a short time. It can be used to show feedback to the user in response to action such as form submission, etc.
Most people use default Toasts at the initial stages of the project and move to the pop-up dialog box later. According to them, Toasts look boring and monotonous, but this isn’t always true.
Just like any other component of Android, you can also customize Toasts in various ways. You can change color, shape, font size; add gravity, and even add images. So, let’s have a look at how you can create your own custom toast with an image and text for your Android apps.
Also Read: 5 Tips to Speed Up Gradle Build in Android Studio
How to Create Custom Toast in Android?

First of all, you’ll have to create an XML layout file and add all the items that you want to display inside the Toast. Just remember, the layout_height and layout_width should be “match_parent” to cover the entire area available. And, don’t forget to add layout id.
custom_toast.xml
<?xml version="1.0" encoding="utf-8"?>
<LinearLayout xmlns:android="http://schemas.android.com/apk/res/android"
    android:id="@+id/toast_custom"
    android:layout_width="match_parent"
    android:layout_height="match_parent"
    android:padding="10dp"
    android:orientation="horizontal"
    android:background="@drawable/custom_textview">

    <ImageView
        android:layout_width="match_parent"
        android:layout_height="match_parent"
        android:layout_margin="5dp"
        android:src="@mipmap/ic_launcher" />

    <TextView
        android:id="@+id/textview"
        android:layout_width="match_parent"
        android:layout_height="match_parent"
        android:paddingRight="5dp"
        android:paddingTop="5dp"
        android:gravity="center"/>

</LinearLayout>
Then, create another XML file for the appearance of the text view which will be used as background in the above layout. This file should be present in the drawable folder.
custom_textview.xml
<?xml version="1.0" encoding="utf-8"?>
<shape xmlns:android="http://schemas.android.com/apk/res/android"
    android:shape="rectangle" >
    <solid android:color="#c0cfff" />
    <stroke
        android:width="2dp"
        android:color="#5870cb" />
    <corners android:radius="10dp" />
</shape>
Now, go to the MainActivity.java file, look for the onCreate() method, and add the following code. Though I tried to explain each step in the code, it would be better if you proceed with the basic concept i.e what needs to be done here.
In simple words, first, I am inflating the custom layout, creating Toast, setting properties such as duration, gravity, view, etc, and showing it.
MainActivity.java
// Inflating the custom layout
LayoutInflater inflater = getLayoutInflater();
View layout = inflater.inflate(R.layout.custom_toast,
        (ViewGroup) findViewById(R.id.toast_custom));

// Finding the view in the inflated layout
TextView textView = layout.findViewById(R.id.textview);

// Setting the text
textView.setText("Yes! It's Working..!!");

// Creating Toast
Toast toast = new Toast(getApplicationContext());

// Setting the duration of the Toast
toast.setDuration(Toast.LENGTH_LONG);

// Setting the position of the Toast
toast.setGravity(Gravity.CENTER_VERTICAL, 0, 0);

// Setting the Inflated Layout to the Toast
toast.setView(layout);

// Showing the Toast
toast.show();
Recommended: 5 Useful Tips for Becoming a Successful Android Developer
That’s it for this article. I hope you understood the concept and can now create custom Toasts. If you face any problem by following this article, do let us know in the comments below.

